Section 4 Styles
4.1 Introduction
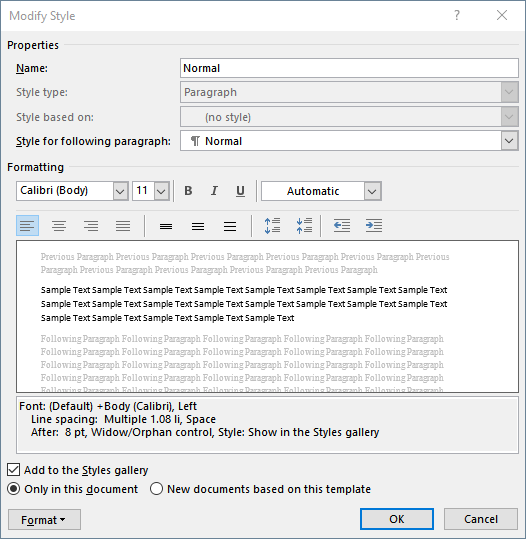
Styles in Word control nearly all aspects of a document’s appearance. Each style has a name that is associated with all of the controls for the style. For example, to view the Normal style, in the Home ribbon, R-click the Normal style and select Modify.

This shows that the Normal style controls paragraphs, does not inherit from another style, uses Calibri 11, has 1.08 line spacing, has 8 pt spacing after the end of the paragraph, uses widow/orphan control, and is shown in the styles gallery.
Every character in a word document has some style associated with it. The most basic style is the font face and size. Paragraphs also have styles. Some of the important stylistic controls include
- font face and size
- line spacing and paragraph spacing
- indentations
Headings are also associated with styles.
The key takeaway from using styles is that if you effectively use styles, any characters, paragraphs, or headings that are of a certain style inherit all of the properties of the style. Modifying a style will automatically change all text having that style to match the new style properties.
4.2 Create a character style
Styles can be created de novo. In this exercise we will be creating a character style.
Click the pick list control at the lower left of the list of styles and select Create a style.


Click Modify which will allow us to set the properties of the style.

Change the style name to courier 10 and set it as a character style following these setups:

Select some text …

… and then click the courier 10 style, which then change the selected text to Courier 10.

4.3 Alter a character style
To show how a style can be changed, which will then change the objects with those stylistic properties, R-click the courier 10 style and select Modify.

Click the toggle controls for bold and italic font face.

Which then shows the courier 10 formatted text changed to the new style.

Other styles are created and modified in a similar fashion. The default new style creates a style that has both character and paragraph controls. If you wanted to create a style to control only paragraph properties (i.e., alignment, indentation, spacing, tabs, etc.) and not character properties, create or modify a Paragraph style.
4.4 Heading styles
Word has some default heading styles using Calibri light, a light blue font face, and different size and italics settings.

These can all be changed. Particularly for research proposals, it can be helpful to use hierarchical lists:
I.
I. A.
I. A. 1.
II.
II. A.
II. B.
...
or integers with dots:
1
1.1
1.1.1
1.1.2
1.2
1.2
...
The most direct way to achieve this is to select some text in the Heading 1 style and then within the Paragraph section of the Home ribbon, click the desired multilevel list

This sets the indexing for the headings. Then modify the font face for each heading style for different font face, color, etc.
Here I have changed the four first heading styles to use Calibri normal 12 pt.

Again, any headings that were created using the styles will change if the style is modified. For example, changing from decimal to alphanumeric outline format requires only that we select a heading with style Heading 1 and choosing a different multilevel list format:

Consider how much work it would be to change from decimal to alphanumeric indexing if all of the index values, paragraph, and character properties were handled line-by-line. Additionally, using heading styles with lists allows automatic renumbering when headings are edited. For example, suppose we had a number of headings for a scientific paper:
Here I have changed the four first heading styles to use Calibri normal 12 pt.

Again, any headings that were created using the styles will change if the style is modified. For example, changing from decimal to alphanumeric outline format requires only that we select a heading with style Heading 1 and choosing a different multilevel list format:

Consider how much work it would be to change from decimal to alphanumeric indexing if all of the index values, paragraph, and character properties were handled line-by-line. Additionally, using heading styles with lists allows automatic renumbering when headings are edited. For example, suppose we had a number of headings for a scientific paper:

It seems we have left out the Discussion section. We can easily add a new paragraph …

… and change its format to Heading 1:

The other benefit of using headings is that tables of contents can easily be built using these styles. Imagine if your headings were entered manually and you built your table of contents manually. This would require a tremendous amount of time and effort. Now suppose you needed to add a section near the beginning of your document. You would need to repeat the same mind-numbing and error-fraught process!
4.5 Strategy for formatting a document with styles
Although styles can be changed at any time, it is recommended to set up your document structure as the first step, creating the named sections with heading styles, body paragraph, caption, and any other styles.
For example, you may want all of the body paragraphs to have an indented first line and no space after the paragraph. Or you may want to have no indented first line, but to have 3 pt. spaces after each paragraph.