UW Tacoma Library Laptop Checkouts by Quarter

The library laptop checkout program was started with Student Tech Fee money back in 2010. Since then the program has grown from 10 clunky old Dell laptops to 15 slick new Surface Pros and 8 MacBook Airs and I can say that in its current configuration it has been wildly popular.

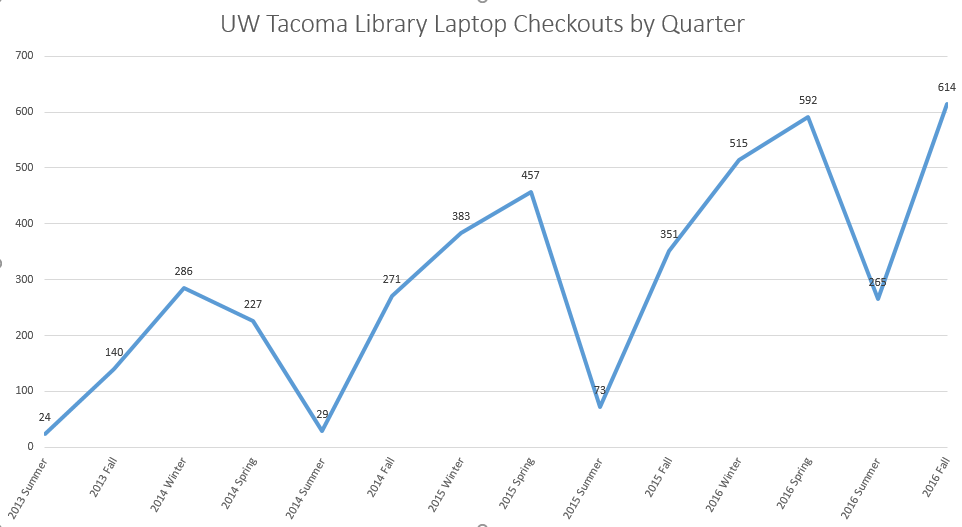
The Library started collecting stats on laptop checkouts in Summer of 2013. That quarter the library only checked out a laptop 24 times. That makes sense to me because they were old, slow, and heavy. They were still somewhat popular because people needed laptops. And as recent as Spring 2015, the Library was checking out laptops 457 times a quarter.

That all changed last summer when the STFC (student tech fee committee) funded 15 new Surface Pros and 5 new MacBook airs.

The first quarter that we had modern computers for checkout, the number of checkouts went up by 80 over the same period the year before.

The second quarter, as word of mouth spread, checkouts increased by 132 for the quarter. And by Spring of 2016, that number went up to 592 checkouts. for the quarter. An increase of 136 over the same period in the year before.

So, the library went back to the students and asked for 3 more laptops. And this fall, the library checked out laptops 614 times. 343 more times than we had with the older laptops and 263 ,more times than in the previous fall.

This partnership has been a great success for the students at UW Tacoma. And a huge thank you to the students for funding this program is in order. As well a huge thank you to the circulation staff at the Library who have the thankless task of checking out all these laptops along with a rather onerous inspection process.

Despite some setbacks you can bet that the Library will be asking for more laptops from this next round of Student Tech Fee proposals.

(Graphic showing increase in laptop use over 3 years from 140 checkouts in Fall 2013 to 614 checkouts in Fall 2016.)

(Graphic showing increase in laptop use over 3 years from 140 checkouts in Fall 2013 to 614 checkouts in Fall 2016.

Qq

Success and failure of a simple dual-extrusion custom keychain

Purple keychain, 100mm long, 25mm wide, with white lettering on it which reads A V E L I N E

On Wednesday I taught a simple class on 3D printing and design to the Library and TLC staff. In that class I taught the attendees how to create a custom keychain using tinkercad.com. That custom keychain is two colors and features my daughter’s name, Aveline, which is an unusual name and perfect for showing people the power of 3D printing: that we can design unique or unusual pieces which we can’t simply buy off the shelf at WalMart. The design also shows off the power of the Library printer because I can print it as a dual-extrusion object.

Here are some photos¹ of the designs.

First, the keychain itself:

This is a flat, red, plastic keychain fob, 100mm long, 25mm wide, and 10mm tall, with an oval opening on one end and a flat area to take a name

Next the letters which would fit on the keychain bed.

White letters which spell A V E L I N E meant to rest on the bed of the keychain fob

When creating a dual-extrusion object we actually need to create two .STL files and then combine them on the Makerbot software platform. This allows me to select a different nozzle for each object and thus a different color for each component. I then put the two files on top of each other and create a single object which the Makerbot software will know to use two different colors to print.

The first print didn’t meet my expectations.

Purple and white keychain with the name A V E L I N E on it, showing some major flaws in the printing process

First, the edges “lifted” and curled. This happens when the plastic (we actually don’t use plastic, we use a bio-polyester called Polylactic Acid) is heated and then cools more rapidly on the edges. The PLA “shrinks” and causes bowing in the flat design.

The second flaw was that the white and purple didn’t purge properly between layers. 3D printers are additive printers: each object is built from a series of horizontal slices. The problem is that the printer was still dripping white when it went to make a purple part of the slice and purple when it went to make a white slice. Thus you get white filament mixed in with purple.

Think of it like building a bunch of burgers: you have bottom bun, burger, lettuce, and tomato. Now, imagine you have a ketsup and mustard bottle dangling over your series of burgers. You want to  get ketsup on the gross people’s burgers and mustard on the regular people’s burgers. If your machine doesn’t purge the ketsup off, you could get little drips of ketsup on the mustard burgers. And no one would be happy. That’s what happened here.

To fix these problems I slowed printing down from 30mm/s to 10mm/s, lowered the filament heating temp to 200C and lowered the bed temp to 60C. I also added “purge walls” which are places that the nozzle can offload filament between colors.

This fixed the problems. Higher temps are needed to print at higher speeds so that the liquid PLA can flow properly but since it’s so hot the filament often continues to flow after it’s told to shut off, by lowering the temps and slowing the job down, plus adding purge walls, I was able to achieve a fairly clean result.

Purple keychain, 100mm long, 25mm wide, with white lettering on it which reads A V E L I N E

Astute observers will note that there are still some strange lines on the flat parts of the design. Those aren’t design elements but rather “ghosts” from the second nozzle: as the one nozzle lays down a layer of filament, the other nozzle next to it is literally dragging through the design. This is a problem with this machine and a major reason why some people just take the second nozzle off.

Qq

¹In order to improve accessibility for screen readers I will try to include alt text descriptions of my objects such as in this case: This is a flat, red, plastic keychain fob, 100mm long, 25mm wide, and 10mm tall, with an oval opening on one end and a flat area to take a name. I will gladly accept any advice on how to make this more accessible.

First slice of pi

Hey.

I’m Tim Bostelle, the Head of IT for the UW Tacoma Library.  This is my blog about 3D printing.  I’ll be using this blog to chronicle the successes and failures of the UW Tacoma Library 3D printing program.

The program is simple. You’re a UW Tacoma Student, Staff, or Faculty.  You want to print an object for your class. It could be an art piece that you created. It could be something for your iPhone. It could be a 3D model of a mathematical formula. But whatever it is, you want to print it and you can accept that we print in PLA*.

You simply contact me! Send an email to me at tbostell@uw.edu and I will take a look at your project and see what we can do to print it for you. You don’t need any expertise, though it might help to know how to create 3D models.

There is more information about the printer that we are using and the rules of the road on our official web site, here.

For now, here’s  piece that I printed for a colleague. It’s a “Tower of Pi” and the model is available on thingiverse. 

This object took 14 hours to print and as you can see, it has little whispy bits between the numbers. This happens because I printed TOO FAST! Or maybe too hot. But I had to print it hot, so that I could print it fast. If I hadn’t printed it that hot and fast, it would have taken days to print.

Anyway, watch this space. More print jobs forthcoming!

Qq

*Polylactic acid.