Heat Gun / Soup Can Nano-Roaster
I'd been roasting with a HG/DB for several months. I liked the simplicity of a heat gun, a steel bowl, and a wooden spoon. Roasting sequential batches was tiring, though, so when I happened upon Tim Eggars soup can roaster — which I stumbled upon through homeroasters.org — I had to try it. (If you're ever hunting for ideas, or for proof that this hobby can turn into an obsession, you also might want to check out Sweet Maria's gallery of do-it-yourself roasters.)
 Tim uses a gas burner underneath the can, but I, as others have done ,
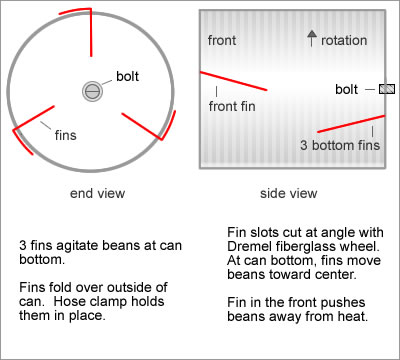
aim the heat gun into the can. This creates an asymmetrical heat source. To adjust for this, I tilt the can. And I angle the agitating fins to move the beans toward the center of the can. The diagram at right tries to shows the placement of the fins.
Tim uses a gas burner underneath the can, but I, as others have done ,
aim the heat gun into the can. This creates an asymmetrical heat source. To adjust for this, I tilt the can. And I angle the agitating fins to move the beans toward the center of the can. The diagram at right tries to shows the placement of the fins.
I originally used pop rivets to secure the fins, but Eggars' method of cutting slots with a Dremel is quicker and easier, and beans are less likely to get stuck. With a pop rivet, the entire fin is inside the can, and beans can become caught where the fin bends.
This setup is good for test batches, roasting 2 to 3 oz at a time — or around 8 - 12 brewed cups of coffee. (For 3 oz batches, I angle the can higher, and tip the heat gun downward a bit.
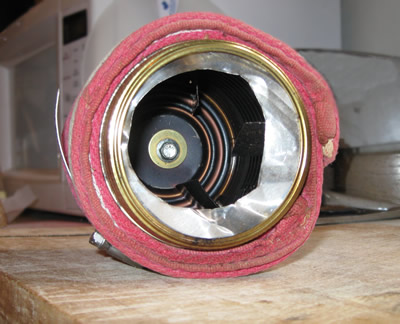
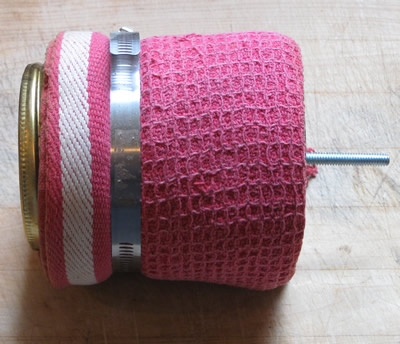 Here's the can itself. I'd planned to wrap it in fiberglass insulation for roasting outdoors. But the rag I used as a stop-gap measure works well enough. I'm roasting indoors, now, and the rag allows me to keep the heat gun on a lower setting. And it helps prevent burns — though the hose clamp still gets plenty toasty.
After several months of use, small cracks began to radiate from the hole around the bolt, due to the constant thermal pounding. So I replaced the original bolt with a sturdier one, and placed washers on either side of the can to shore it up.
 The soup can is actually a stew can — the same diameter as a wide-mouth canning jar ring.
The foil that partly blocks the can's opening I cut from a Stouffers macaroni and cheese container. 3 or 4 tabs protrude from the outer edge of the foil and are under the canning ring to keep the foil in place. The wider section of foil blocks the beans as they tumble over the front fin.
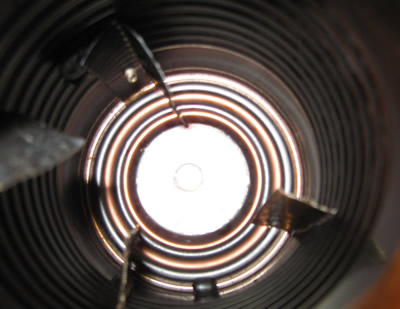 In this interior shot, the front fin is on the left. If you compare the angle of the fin to the concentric rings on the sides of the can, you can see that the fin is not perpendicular, but runs at a slant.
The can rotates counter-clockwise, so when the beans tumble over the front fin, they should also slide back toward the middle of the can.
Tim Eggars' design has the advantage of a good, uniform heat source along the bottom of the can, but I'm fond of the heat gun because I don't have to deal with combustion gases, and I suspect it uses a little less energy overall. By angling the fins, the beans roast fairly evenly, and the heat gun roast retains more of the aromatic flavors typical of an air roast. (That's my pet theory, anyway.)
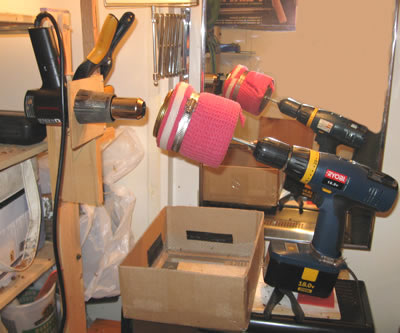 Here's the setup, ready to roast. (If you happen to have a heat gun and cordless drill already, materials cost $5.00 - $10.00.)
You can barely make out the smaller hose clamp at the bottom of the drill's handle, just above its battery. Once you've adjusted the clamp to produce 40 - 50 rpm, you can slip it on and off the trigger without further adjustments. You want to keep the beans moving, but not so fast that they bunch down toward the bottom of the can.
The heat gun is positioned so that it doesn't blow directly on the beans. Due to the angle of the can, the blast of hot air primarily hits the back of the can above the beans, although they are lofted briefly into the heat by the fins. I'm trying to avoid cauterizing the surface of the beans with a direct blast of air.
The drill is propped up to help prevent beans from spilling. The drill and its prop are sitting on a thin piece of plywood, which makes it easy to slide the can nearer and farther from the heat gun. Distance is how I manipulate heat.
My $20 heat gun has a low (700f) and high (1000f) setting. When roasting outdoors, low was too slow, particularly in cooler or windy weather, but since moving the setup indoors, I've been roasting entirely on low. (Notes about roast "profiles" are here.)
I aim for roast curves similar to the general guidelines Willem Boot described in "Reflections on Roasting Fundamentals" — but sadly the link has disappeared. The general idea, as I recall it now, is to extend the roast between 1st and 2nd crack, without stalling the roast. I think he had tips on how to manage a large commercial roaster to achieve this . However, my setup requires different methods.
For high-density beans, I increase heat farily steadily.
- 1.0" for 1:00 (nozzle 1 inch from can for 1 minute)
- 0.5" for 1:00
- 0.0" for 2:00 - 4:00 (length depends on bean)
- -0.5" until 1C (nozzle is 1/2 inch into the can until first crack)
- 1.0" until 1C is finished
- 0.0" until end
(NB: The timings here worked well for my original 700watt heat gun, but I'm now on my 4th or 5th, and each is different. My current DeWalt is too wimpy on its low settings, so I've extended the nozzle and run it on high. This means I start the can farther away from the nozzle:
- 2.0" for 1:00 (nozzle 2 inches from can for 1 minute)
- 1.75" for 1:00
- 1.5" for 1:00
- 1.25" for 1:00
- 1.0" for 1:00 (nozzle is 1 inch from can and 1st crack usually starts during this interval)
- 1.0" until 1C is finished
- 1.0" or closer, depending on the bean, until the beginning snips of 2nd crack.
For more delicate beans, I might advance in 1/8" increments so they arrive at 1C later. In either case, I prehead the empty can for about 1 minutes before adding any beans.)
I try to apply ample heat for a minute or so before first crack, but different varieties reach 1C at different times, so the 3rd phase of the roast varies in length.
(Guatemala Oriente, for instance, reaches 1C somewhere between 6:30 and 7:00, so I move the nozzle 1/2 inch into the can at 5:30. Kenya Ndaroini hits 1C around 5:00, so I intensify heat at 4:00 minutes.)
For low-density beans, I aim for a gentle, consistent build in heat, ending the roast without too much momentum:
- 1.0" for 3:00
- 0.5" for 3:00
- 0.0" until 1C (30-60 seconds)
- 1.5" until 1C is finished (longer for espresso roasts)
- 0.5" until end
For most roasts, I turn off the heat gun 10 - 20 seconds before cooling. This allows laggers to catch up a bit and helps prevent driving vanguard beans too far into 2C.
This roast of 2.5oz Ophiolite Blend Espresso produced beans with no oil spots, but a nice muted sheen, a decent FC+ roast.
- 1.5" for 1:00
- 1.0" for 2:00
- 0.5" for 3:00
- 0.0" for 2:00 (first snap of 1C @7:52)
- 1.0" for 3:30 (last snap of 1C @10:43)
- 0.5" for 0:40 (2C @11:59)
- heat OFF @12:10
- cooled beans @12:30 (3 or 4 snips into 2C)
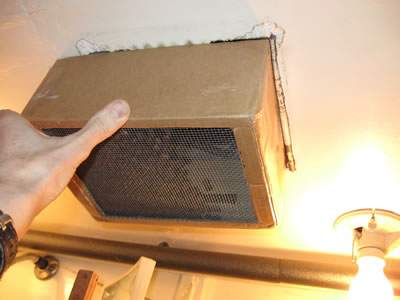 Below the can is the cooling tray — just a cardboard box with the bottom cut out and a piece of hardware cloth duct taped inside. Eventually I'll build a light-weight hemlock box.
The entire contraption sits below an ancient ceiling fan in our out-of-code basement bathroom. When the roast is finished, I dump the beans into the box, then hold it under the fan.
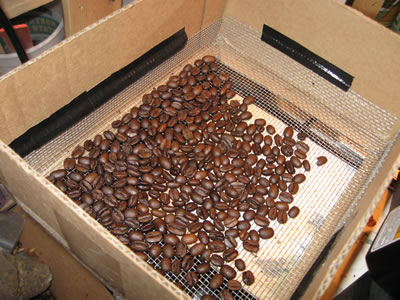 The beans cool in about 1 minute. At right is 2 oz of Guatamala Oriente cooled just as it entered 2nd crack.
Here's a short, uneventful movie of the roaster in action. The beans are a couple of minutes prior to 1st crack. In this otherwise unremarkable video, you can see the chaff is separating from the beans and blowing out of the can. In another minute or so, I'll move the nozzle into the can for the final approach to 1st crack.
(If the video window turns white, you may need to scroll the browser window.)
Other roasting methods I've tried
- Hearthware I-Roast I.
My first roaster. I burnt it out after 8 months from overuse. I found it really hard to control, but was hooked on roasting nonetheless.
- Stovetop Popper.
Since we lack a good kitchen fan, and since my family inexplicably doesn't like the smell of coffee, roasted or otherwise, I found consistent results challenging outdoors. Occasionally good batches, particularly for darker roasts. Much better for peaberries than flat beans.
- Heat Gun / Dog Bowl (actually, stainless steel pot)
During good weather, often excellent results — especially for a press pot. Tougher to get good results on cold, windy days.
5-6oz per batch generally yielded more uniform results than smaller batches. 3 or 4 batches in a row were an efficient route to tennis elbow.
Like an open pan on a burner, this method is a quick way to develop good instincts about roasting — the sound, smell, and look of the beans are all readily apparent.
- Heat Gun / Soup Can
(This was my neighbors' favorite method. My setup was next to their kitchen porch, and they, as right-thinking people do, love the smell of coffee.) Outdoors in good weather, yielded good, sometimes excellent results. Consistency still a struggle, particularly in colder weather.
Indoors, I've been very happy with the results. Roasts are much more predictable and reproducable. Small batch size is a disadvantage, unless you love frequent roasting. And, it's effortless. It's also nice not to be turning wooden spoons into charcoal, as happens with the dog bowl method.
- Behmor 1600
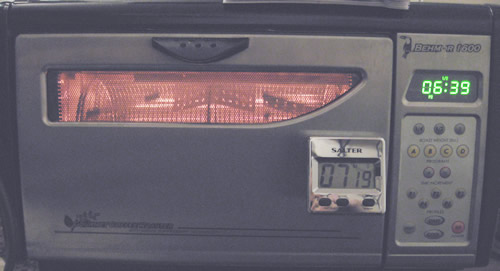 My trusty Behmor in mid-roast. I often use it to roast espresso blends or Brazillian coffees. The P2 profile is a little tricky but good for knocking down acidity. Brazil Ipanema Tree Dry Process, the Ophiolite Blend, Puro Scuro and such roast well in this machine.
However, I prefer the heat gun for high-grown, high-density beans. Big fruity or floral coffees roasted in the Behmor taste a bit dull to me. (Some users say Behmor-roasted coffee needs about double the rest period of other methods.)
NOTE: the Behmor depends on adequate voltage. As everyone says, a Kill-o-Watt is an indespensible accessory.
Many users also mention the timer. They'd prefer a count-up to a count-down timer. I've modded my Behmor to have both — nothing like a cheap count-up timer with a magnet.
Below is a 24-second double shot from 15 grams of Brazil Ipanema Tree Dry Process beans. (They're from a 4oz batch roasted in the Behmor. The Behmor was set for a 1/2lb on the P2 C profile, and the roast was cooled 6 snips into 2nd crack).
Producing something like this.
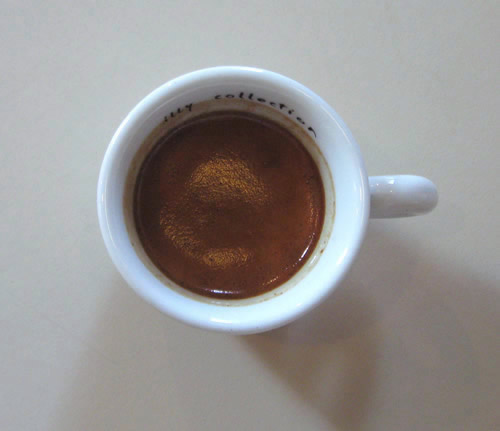
The crema on this 1.5oz double shot is thick and fairly uniform in color. A 0.75oz ristretto will be darker and less uniform. (The pictures of a few pours mainly show patterns in divided double shots or ristretti.