"VACUUM ATMOSPHERES" Omni-Lab Glovebox, apparent V1 solenoid or pedal fail, actually failed PLC Mitsubishi FX1S (or FX3S on later models)
PLC controller has one bad internal relay, the "V1" N2 gas valve, either loud buzz, stuck on, or not being driven. Relay contacts worn out by glove-leak. Open PLC and solder in a new relay.
SYMPTOM: no glove-inflate, one 24VAC ASCO gas valve not working. We've seen this symptom on three different gloveboxes w/Mitsubishi PLCs, FX1s or the later version has FX3s. Caused by one failed relay inside the Mitsubishi PLC Programmable Logic Controller ...always the same one fails. (It contains eight tiny relays, with contact-lifetime shortened by driving inductive 24V AC coil-loads.) The bad relay does audibly "click," 24VDC coil reads correct 4700ohms, but the contacts remain open-circuit. There must be major oxidation on the relay contacts. Usually it's failing contacts for "V1" valve on Y3 screw terminal. That's the N2-fill valve, so with leaky gloves, it cycles constantly, perhaps every five or ten seconds, which beats the contacts to death, and causes relay to fail early. Repair your gloves, so the N2 fill only clicks once after many minutes ...not ten times PER minute!
GLOVEBOX: PN 101965 Vacuum Atmospheres Co. "Omni-Lab" 2004
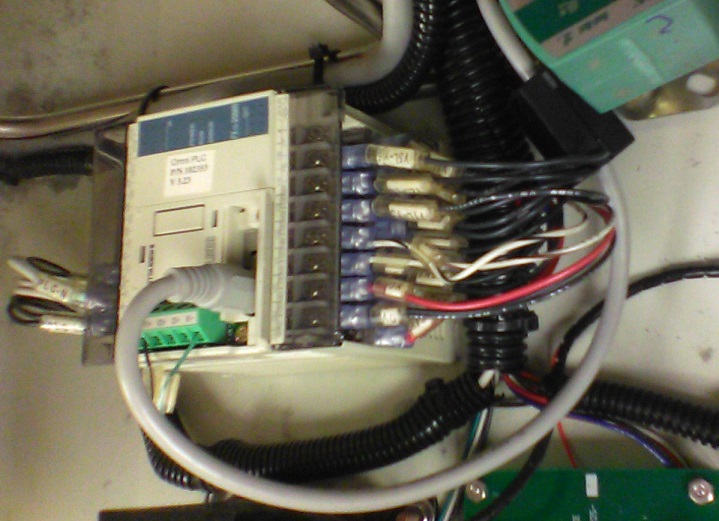
PLC block: quite old "Melsec" FX1S-20MR-ES/UL Mitsubishi Electric, also a PLC FX3s on later versions.
N2 valves: ASCO red hat OFKF8262G208, coil 24VAC. ON EACH VALVE, REPLACE THE LITTLE RED 47ZA1 THIRTY-VOLT VARISTOR. If these surge-suppressors fail, either it partly shorts out the solenoid, else it applies full inductive voltage-spike to relay contacts. Perhaps the bad relay was killed by a failed varistor?
On FX1S model only, accessing the internal pcb relays:
- Remove 120VAC, unscrew all PLC wires (take pictures, write down wire lables!)
- Remove two nuts to remove PLC from glovebox (used tiny screwdriver to pry nuts sideways, loosen.)
- Open tiny door on PLC top, remove one screw from tan plastic (NOT the screw in the green pcb.)
- Pry up the 1.5" square plastic cover from the top (it's held in by four tiny snap thingies)
- Remove the long screw (NOT the screw on the small green pcb)
- Pry off the entire main cover (held in by three little snaps, visible through vent-slots.)
- Remove one screw from main PCB
- Pry up the main PCB by spreading the plastic case slightly with thin screwdrivers (it's held in by horizontal vent-slots in the sides of the plastic case.)
- Find eight relays on the bottom of the PCB: RB104-DE 6amp SPST relays 24VDC coil, 4700ohms 5mA
On FX3S model only, accessing the internal pcb relays:
- Remove 120VAC, unscrew all PLC wires (take pictures, write down wire lables!)
- Remove two nuts to remove PLC from glovebox (used tiny screwdriver to pry nuts sideways, loosen.)
- Remove two plastic-tap corner screws hidden under PLC terminals doors, DON'T remove the black 5-pin port (goes to pressure sensor?)
- Use thin screwdriver to push in the four plastic catches, two on each side (one on right, one center-ish,) while gradually prying along the gap on both sides. Go slow, back and forth (you're unplugging a big multipin pcb connector.)
- Remove the PCB you see. It's held in by tabs, so bend the white plastic enclosure out a bit.
- Find eight relays on the next PCB: APAN3124 5amp SPST relays 24VDC coil, 5240ohms 4.6mA
REPLACEMENT RELAYS:
I dissected a couple relays. Yes, the contacts are badly corroded after +10y of c constantly switching the nitrogen-fill solenoid. (A varistor across the coil is REQUIRED. Failed varistors will shorten the relay contacts' lifetime, if the relays don't simply die of old age.)
On FX1S plc only, original relay: RB104-DE 24V coil, 5mA, 6A contacts, Fuji Electric, no longer sold
Other replacements:
* PA1aS-24V 24v coil, 7.5mA, 5A contacts, Panasonic
* RB105-DE 24V coil, 8.3mA, 6A contacts, Fuji Electric
* RS4N-DE (large relay assy., contains four RB105-DE)
* G6DN-1A-SL DC24 24V coil, 5mA, 5A contacts Omron
* G6DS-1A-H DC24 24V coil, 5mA, 5A contacts Omron
* PCN-124D3M 24V coil, 5mA, 5A contacts Tyco
Instead, the newer FX3S plc uses the widely-sold Panasonic APAN3124, 24V coil, 4.6mA, 5A contacts, same basic relay as above, but with different pin placement than the RB-104.
NOTES:
Perhaps buy an old used FX1S plc? On youtube there are tutorials for downloading the SW contents of these PLC blocks, to clone the manufacturer's code. First must build/buy an RS232 programming cable. (I don't know if the glovebox's own DIN 9-pin serial cable can be used. I don't know if Vacuum Atmospheres has blocked our ability to read and "clone" their pgm into new replacement PLC-units.)
NOTES:
Four relays Y0, Y1, Y2, Y3 have pairs of electrically isolated contacts.
Remaining relays Y4, Y5, Y6, Y7 are ganged together with COM4 switch terminal in common
Wire labels upper (eight relays)
- n.c. unused relay?
- Y6 (n.o. to COM4)V5L (bk)
- Y4 (n.o. to COM4) V2L (bk)
- Y3 (n.o. to COM3) V1L (bk)
- Y2 (n.o. to COM2) (wh/bk)
- Y1 (n.o. to COM1) (wh/brn)
- Y0 (n.o. to COM0) (rd)
- 0V (-24V) (bk)
wire labels lower (eight relays)
- Y7 (n.o. contacts to COM4) V6L (Bk)
- Y5 (n.o. contacts to COM4) V3L (Bk)
- COM4 (to V2, V3, V5, V6) (Bk)
- COM3 (to Y3 V1) (Bk)
- COM2 (to Y2) (Bk)
- COM1 (to Y1) (Bk)
- COM0 (to Y0) (Bk)
- +24V (Rd)
wire labels AC pwr upper
- n.c.
- n.c.
- n.c.
- n.c.
- n.c.
- x0 (bk)
- PLC-N 120Vac (wh) (3 wires, two stacked fork-terms!)
- PLC-L 120Vac (bk)
wire labels AC pwr lower
- n.c.
- n.c.
- n.c.
- n.c.
- n.c.
- X1 (wh)
- S+S (bk)
- earth (gn)
VALVES
- V1 pressure dry N2
- V2 vac. pump
- V3 ?
- V5 ?
- V6 ?
