The accurate testing of patients at the bedside depends upon the proper usage of the equipment by the operator. The AccuChek is capable of producing highly accurate results if given a good specimen to test.
Testing Protocol (condensed) AccuChek GTS system
1. Power up the unit.
2. Verify Code Numbers match on both instrument and test strip.
3. Input Operator ID (full 9 digit EID)
4. Input Patient ID (full Medical Record # from ID wrist band)
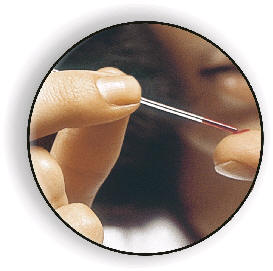
5. Insert a test strip into the instrument.
6. Load test strip by touching the curved side of the strip to the sample. Do not over fill. If the result is critical (adults <50 or >500; neonates >200), then repeat the test. If needed, obtain a tube of blood and send to the lab for a stat glucose verification.
7. Record the result in the patient's medical record.
General Considerations
· The test strips are sensitive to heat, moisture and light. Always keep the vial tightly capped when not in use. If an un-capped vial is found, discard all the strips.
· Ensure that the instrument has the proper Coding Chip by replacing it with the new one found in each box of test strips every time. Test the High and Low controls before testing patients with the new vial of strips.
· The daily control solution bottles must be dated when first opened. They have a 90-day life or the date printed on the bottle, which ever is sooner.
· Over or underfilling of the test strip can lead to erroneous results. Ensure that the yellow target area is filled.
· If the controls fail during testing, try repeat testing immediately; if still out of range, verify that the control solutions are not expired. Next, try a new vial of strips and if this still fails, report this to Clinical Engineering and call Medical Stores to obtain a replacement. Do not test patients with a meter that fails the QC checks.
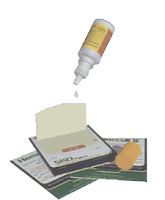
This screening test relies on the guaiac reaction wherein hemoglobin acts as a catalyst in the oxidation of a-guaiaconic acid by hydrogen peroxide. The test is affected by the diet and medication status of the patient. Potential causes for false positive reactions include: oral iron supplements, rare or undercooked meat, fruits and vegetables high in peroxidase activity such as radishes, turnips, broccoli or cantaloupes. Vitamin C in excess of 250mg/day may mask a positive reaction and appear to be negative.
Testing Protocol (condensed)
1. Apply a thin smear of the sample into each test window.
2. Turn card over and open back.
3. Dispense two drops of the appropriate developer onto each test site. Do not interchange the Gastroccult and Seraccult developers, Gastroccult is formulated to work in the acidic conditions of gastric content. Seraccult developer will not react properly in low pH conditions.
4. Interpret results within 60 seconds, the color may fade after 2-4 minutes. Blue or any shade of blue is considered positive.
5. Dispense a drop of developer on to the built-in QC. Seraccult; Performance Control Line
Gastrocult; Pos. Neg. dots.
Do not report patient results if QC fails.
6. Record the result in the patient's medical record.
General Considerations
·Diet and medication status can affect the result.
·Use the correct developer with the correct card for the specimen to be tested. Do not interchange.
·Always test the on-slide QC to demonstrate proper reactivity.
·Weekly QC requirements; record lot numbers and expiration dates for both slides and developers on the QC log sheet.
 This screening test measures the hemoglobin released from erythrocytes by measuring the absorbance of azidemethemoglobin at both 570 and 880nm to compensate for turbidity. Proper filling of the test cuvette is essential for producing accurate results.
Testing Protocol (condensed)
1. Power up the unit.
2. Input Operator ID (full 9 digit EID)
3. Input Patient ID (full Medical Record # from ID wrist band)
4. Verify Code Numbers match on both instrument and test curettes.
5. Fill the test cuvette in one motion, do not double dip. If bubbles are present, do not use for testing.
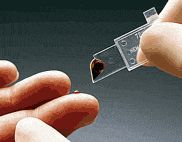
HemoCue recommended fingerstick technique:
·Avoid fingers with rings. Clean the puncture site with disinfectant and allow to dry.
·Warm patient's hands if necessary to improve blood circulation.
·Using your thumb, lightly press the patient's finger from the top of the knuckle to the tip. This will stimulate the blood flow.
·With your thumb, apply gentle pressure at the tip of the patient's finger, prick at the side of the fingertip.
·Wipe away the first two or three drops. This will also stimulate the blood flow. If necessary, apply light pressure again, until another drop of blood appears. Avoid "milking".
6. Record the result in the patient's medical record.
General Considerations
· The bottle of cuvettes must be capped when not in use. The cuvettes are affected by heat and humidity. If a bottle is found without a cap, discard all cuvettes, do not use for patient testing purposes.
· The cuvette’s outer surface is an optical field. Wipe off all blood before placing cuvette into the analyzer.
· If bubbles are present in the circular area of the cuvette, do not use for testing.
· The cuvettes have a shelf life of ninety days or the printed expiration date at room temperature whichever is sooner after being opened for the first time. Always date the bottle.
· The control solutions are to be stored in the refrigerator and brought up to room temperature before testing. They are good for thirty days or the printed expiration date whichever is sooner after initial opening.
· Multiply the hemoglobin result by 3 to obtain an approximate hematocrit value.
This is a quantitative assay for the monitoring of heparin anticoagulation during various medical procedures. Fresh whole blood should be used for testing. Any specimen contaminated with tissue thromboplastin, in-dwelling IV solution, alcohol cleansing solution or visible clotting and/or debris accumulation should be discarded immediately.
Testing Protocol (condensed); Hemochron FTCA510 tube method
1. Depress the SELECT button to begin pre-warming the test well.
2. Collect a fresh whole blood sample in a syringe.
3. Dispense exactly 2 cc of blood into the FTCA510 test tube. At the same time, press the START button on the instrument.
4. Close the flip-top and agitate vigorously 10 times to disperse the activator.
5. Insert test tube into test well, rotate the tube clockwise until green DETECTOR light is lit. Turn 1 more revolution to ensure that the green light remains on.
6. Instrument will beep and the display will flash when a clot is detected.
7. Record result in Patient's medical record.
Quality Control Considerations
· Two levels of the Electronic System Verification (ESV) tubes must be tested each shift when patients are tested.
· Two levels of liquid QC material must be tested each time a new box of FTCA510 tubes are open for usage.
· Once a month, use the HE1001 Temperature Verification Tube to check the temperature of the test wells.
· All Quality control activities should be documented on the QC log sheet.
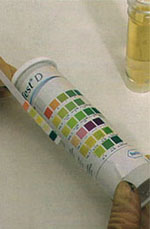
This screening test is used to detect a number of analytes useful as an indicator of health or disease especially in the areas of metabolic or renal disorder.
Testing Protocol
1. Collect patient sample into a clean specimen container.
2. Remove a single dipstick from the bottle. Recap the bottle immediately.
3. Insert dipstick into urine sample and begin timing.
4. Withdraw dipstick and drain excess urine from stick to avoid spill over effects.
5. Compare the color reaction for each pad to the color chart on the bottle at the time specified for each test.
6. Document patient results in the patient's medical records.
General Considerations
· For best results use a clean, fresh first-morning specimen.
· Any conditions that mask or alter the color development of the test pad will interfere with the visual interpretation of the test. Unusually colored urine should be sent to the lab for testing.
· The dipsticks are vulnerable to heat, moisture and light. Uncapped bottles of dipsticks should be discarded.
· Accurate timing is essential for best results. Do not read beyond the time limits.
· Record lot numbers and expiration dates of dipsticks on the QC log sheet once a week.
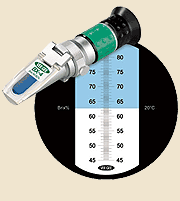
Specific gravity is an assessment of the amount of dissolved solids in a fluid. The refractometer measures specific gravity indirectly by measuring the angle of refraction (light bending) caused by the solutes (such as glucose and protein) in a beam of light.
Testing Protocol
1. Place a few drops of urine on to the glass platen.
2. Gently lower the plastic cover.
3. Hold the refractometer towards a light source.
4. Look through the eyepiece and determine where the line of demarcation crosses the specific gravity scale.
5. Record patient's result in the medical record.
6. Clean and dry the refractometer after each use.
General Considerations
· The refractometer is temperature compensated to read optimally between 15.6°-37.0° C. Allow refrigerated samples to warm to room temperature before testing.
· Do not aim the refractometer up towards a ceiling light fixture, any excess urine can roll towards your eye and contaminate you.
· The eyepiece is adjustable for focus.
· Inadequate sample volume will produce a hazy or indistinct line of demarcation.
· Do not use harsh chemicals or alcohols for cleaning.
· Two levels of QC solutions must be tested and the results recorded on the QC log sheet once a week.
This is a definitive test that measures the maximum packing of the red blood cells in a whole blood sample by centrifugation. The space occupied by the RBC is measured and expressed quantitatively as a percentage of the total volume.
Testing Protocol
1. Fill at least two capillary tubes a minimum of 2/3 full with whole blood.
2. Seal one end of the capillary tube with clay.
3. Place sealed tubes symmetrically (clay end towards the rubber cushion along the outer edge of the rotor) for balance into the grooves of the centrifuge rotor head.
4. Secure the cover plate over the rotor head and close the top cover down over the assembly.
5. Set timer for five minutes.
6. Remove tubes after centrifugation.
7. Immediately read volume percent using a microhemotocrit reader.
- Place centrifuged capillary tube on to grooved channel with the sealed end towards the center of the reader.
- Align the clay-red cell interface with the 0% baseline mark near the center of the reader.
- Rotate the circular reader disks to the 100% mark. Hold the lower graduated scale disk steady and move the upper curved line disk to the plasma-air interface.
- Rotate the lower and upper disks together until the curved line intersects the top of the red cell column.
- Determine the percent hematocrit by reading the value against the index mark.
8. Determine the average value and record this result in the patient's medical records.

This screening test detects the presence of human chorionic gonadotropin (hCG) in a sample of urine.
Testing Protocol
1. Obtain a fresh, first-morning urine specimen.
2. Remove test device from sealed pouch.
3. Dispense 5 drops of urine into the sample well and start the timing device.
4. Read negative results at 4 minutes, a positive result may be interpreted before 4 minutes has elapsed.
5. Record results into the patient's medical record.
General Considerations
· The first morning specimen will usually have the highest concentration of hCG. Dilute urine may have insufficient concentration of hCG and produce a negative result. Retest with a fresh sample in 48-72 hours.
· The test device may be stored in their sealed pouch at room temperature until the manufacturer's printed expiration date. Once the seal has been broken, the device must be used immediately.
· A pink band must appear at the C (control) region of the test device during testing. Failure to do so indicates an invalid test.
· Do not read beyond the 4-minute reaction time to confirm a negative result. A positive reaction may be seen in as little as 40 seconds.
· The high and low QC solutions must be tested each time a new box of test devices is opened. Store these solutions in the refrigerator at (2-8°C). Record this on the printed QC log sheet.
Last modified: 10/10/2005 8:15 AM