CHAPTER THREE - MENUS
This chapter includes all of the SNAP editors. The purpose of this chapter is explain the use of each editor, column or row definitions, and the use of the special function keys.
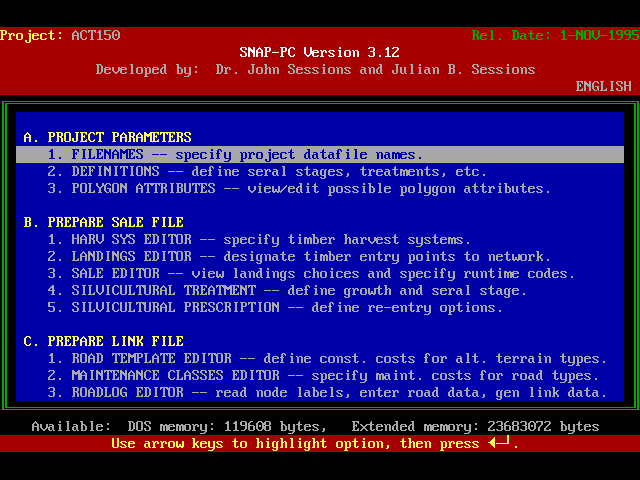
The first menu is the Main Menu. Through the Main Menu you can access Project Parameters, Sale, Link, and Setup Editors, execute the analysis and access the reports. The Main Menu is addressed through the arrow keys or the left button of the mouse.
Main Menu
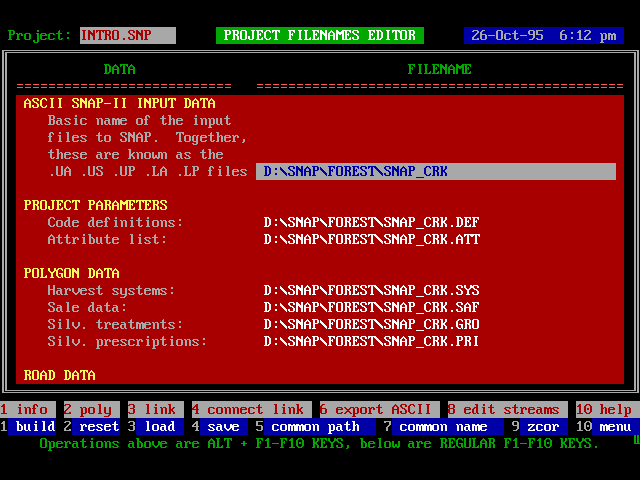
Project Filenames Editor
|
PROJECT |
This is the name of the file which tells SNAP where all your data files are for this project. The default project name is UN_NAMED. |
|
COMMON PATH |
This is the path to the directory containing the data for the project. The default path is C:\PATH. |
|
COMMON NAME |
This refers to the name of the majority of data files. By entering a COMMON NAME, you don't have to manually enter the name of each one of the 30 different files used by SNAP. At startup, the default common name is NAME. |
|
OUTPUT DIRECTORY |
This is the name of the directory where SNAP will put the report files from the Analysis. |
Special function keys:
|
F1 |
Used to build random access data files from sequential ASCII data input files. These input files include the .UA, .US, .UP, .LA, .LP, .SA, and .SP files. Be sure to supply files in the proper format. The format of these files is specified exactly in chapter 7. The build step must be done BEFORE any graphic or tabular data concerning the data set can read by SNAP. To check if the build step was completed successfully, use the ALT F1 key to receive a graphic display of the new random access files. |
|
F2 |
Used to reset all project names to reside in the path C:\PATH with the name TEST. The file containing these names is also changed to UN_NAMED.SNP, but you should change this to the name of your project once you have entered your new project filenames. (See the F5 and F7 keys for ease of data entry) |
|
F3 |
Used to access and load other .SNP files. All .SNP files are stored in the SNAP startup directory. Each .SNP file contains information on the locations and names of the various components of a project. By making a good choice of filename, you will know which project you are loading just by looking at the name of the .SNP file. |
|
F4 |
This key allows you to save the current data immediately with the option of changing the filename. Note also that the .SNP file will be automatically saved (if you have made any changes since the last save) when you leave the editor via the special function key F10. |
|
F5, F6 |
Used to specify a common path to the data files. Not all your project files need be stored in the same directory, but if a majority of them are, then the common path is a quick method for specifying the directory of the project filenames. For simplicity, we suggest that when you first use SNAP you keep all of your files together in the same directory. |
|
F7, F8 |
This key, in conjunction with the common path key, (F5), enable you to set completely specify the location of project data files in a speedy, efficient manner. The reference, "common name", refers to just the name, not the directory of your data. Take, for instance, :\SNAP\SNAPCRK\JOE.UA, the name is JOE.UA and the path is D:\SNAP\SNAPCRK. Also note that you should not enter the extension of any file (.UA in this example), as SNAP will automatically add it on for you. The program may get confused if you try to help it out by forcing an extension onto files. |
|
F9 |
Used to create some z-coordinates if you did not have any and would like to experiment with the perspective view options. A sine wave is fit to your x and y coordinates to create the z-coordinates. |
|
F10 |
Used to return to the Main Menu. If you have made any changes since the last save, then they will be saved in the current .SNP file. |
|
ALT F1 |
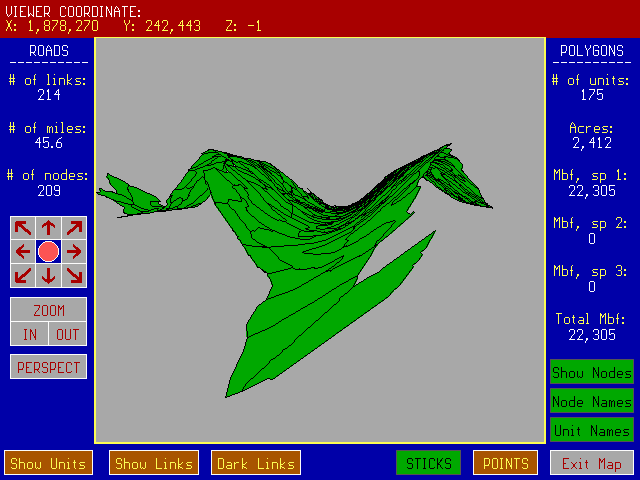
Used to obtain summary information about the project from the stick and point data files including area, number of links, units, volume, and a graphic display of the units and road network. |
|
ALT F2 |
Used to access graphic editor to merge or split polygons. |
|
ALT F3 |
Used to access graphic editor to add, delete or split road links. |
|
ALT F4,F5 |
Used to access graphic editor to check road network connectedness (reachability). |
|
ALT F6,F7 |
Used to export ASCII data from SNAP internal editors to ASCII files in the same data format as the input data. The export data only contains the types of data which were available at input time. See Chapter 7 for types of data. |
|
ALT F8,F9 |
Used to access graphic editor to add, delete, or split stream segments. |
|
ALT F10 |
Used to get help on available commands. |
Building Your Data
After you have specified the path to your project data files, the next step is to tell SNAP to read your ASCII input files and build random access files for later use. You do this with the F1 function key. If your files are in the directories you specified and in the correct format, SNAP will build its files and report that this has been successfully done. If SNAP reports that it cannot find a file, then check your path specification. If SNAP finds a problem while scanning your data, it will display an error message. If this should occur, load your ASCII file into a text editor and check your input format against Chapter 7. If you still have a problem, send us a disk with your data and a note and we will look at it.
Reviewing Project Data
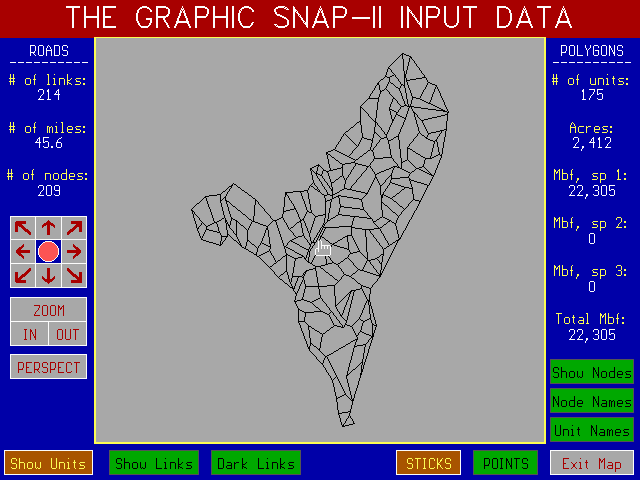
While you are in the Project File Names Editor you can get a visual summary of your input data by using the Alt F1 function key. This will access a graphic screen which will display the polygons, road links, provide a summary of volume by species, total acres, total number of polygons, total number of links, and total link miles. You can also get a perspective view of the area from a user-defined location outside of the area. Since this option only reads your "stick" and "point" input files, it will not be updated after you use the SNAP data editors.
Checking Road Network Connectedness
A fatal error can occur if each possible sale polygon does not have a possible mill destination. One way this can occur is if there is not a connected network between the sale polygon and a mill. To help debug the road network, SNAP has a graphic editor to check which nodes can be "reached" from a selected node. This editor will permit you (a) to check individual nodes by click on that node which will "light" up all nodes which can be reached from the selected node, or (b) to identify all groups of connected nodes. You can ask SNAP to check either the .LS road file or the .LIF road file.
Accessing Graphic Options
To access graphic options you place the mouse cursor in the box and press the left button on the mouse to activate the option. If the box is red, the option is active. If the box is green, it is not.
Box Definitions
|
ZOOM |
Used to identify and control the area you want to zoom in on. To do this, click on this option (turn ZOOM command box red). Next, move to the upper left corner of the area you want to zoom in on and then hold down the left button of the mouse. This will anchor the ZOOM box. Next, move the mouse cursor to the lower right which will increase the area of the dashed ZOOM box. When you have the desired area "boxed", release the left mouse button and then click the left button twice quickly. This will activate the ZOOM. |
|
IN (ZOOM) |
Used to shrink viewing area (make units larger). With this option you can zoom, but you do not have the control over the area in the same way as the method described above. |
|
OUT (ZOOM) |
Used to make enlarge viewing area (make units smaller). To zoom out to original scale place cursor in orange bulls eye and click on left mouse button. |
|
STICK QUALITY |
Uses stick data to make polygon map. |
|
POINT QUALITY |
Uses point data to make polygon map. |
|
UNIT NAMES |
Displays unit names proportional to unit size. You may need to zoom in to read names. |
|
SHOW NODES |
Displays road nodes. |
|
NODE NAMES |
Displays names of road nodes. |
|
LINKS |
Displays road links. |
|
DARK LINKS |
Adjusts link line quality. |
|
ARROWS |
Used to shift viewing area. |
|
BULLS-EYE |
Used to return to original scale. |
|
PERSPECT |
Shows planning area in 3-D perspective. |
|
EXIT MAP |
Returns you to the project filenames editor. |
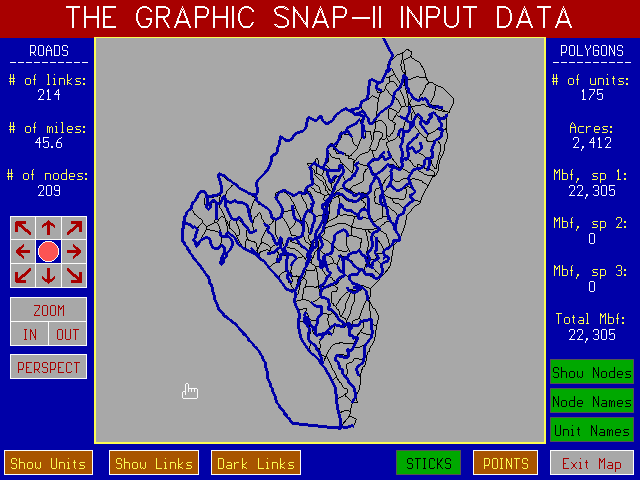
Graphic Input Data Showing Polygons and Links in Point Format
Graphic Input Data Showing Project Area in Perspective
Identifying View Position and Focus Point
In order to obtain a perspective view you must identify the viewer position and the point the viewer is focusing on. You identify the viewer position and focus point using the mouse while you are looking at the two dimensional map.
To identify the viewer position -- move the cursor to the viewer point and press the "V" key on the keyboard.
To identify the focus point -- move the cursor to the focus point and press the "F" key on the keyboard.
After you have identified the viewer position and focus point, click on the Perspective Box to active the Perspective option.
The viewer position can be either outside or inside of the planning area.
Changing viewer position
The x,y,z coordinates of the viewing area are in the top left corner of the screen. The position of the viewer can be changed from its default position using the keypad. Pressing the following keypad numbers results in incremental changes of the viewer coordinates (nd= not defined).
|
Keypad |
Actions |
|||||
|
7 |
8 |
9 |
-x |
nd |
+x |
|
|
4 |
5 |
6 |
-y |
nd |
+y |
|
|
1 |
2 |
3 |
-z |
nd |
+z |
Example: Pressing the "7" key repeatedly subtracts incrementally from the x-coordinate.
To increase the increment press Ctrl + keypad code. To return to the original viewer position, press R on the key board.
EDITING POLYGONS AND ROAD AND STREAM LINKS
SNAP provides a limited ability to edit your graphic polygons and links within SNAP. The objective is to permit you to make minor changes to your graphic input data within SNAP thereby avoiding leaving SNAP during project analysis. The types of changes you can make are:
a. Combining two polygons or splitting a polygon.
b. Adding, deleting or splitting a link.
There are some important points you need to remember.
1. SNAP does all editing changes to graphic data in extended memory. Therefore, to modify your polygons and links you will NEED enough extended memory (2 megabytes is a good number to shoot for although more may be needed for larger data sets).
2. SNAP will not update your data files on the disk automatically during editing in order to permit you to UNDO any mistakes you make. SNAP holds your changes in extended memory until you click on the SAVE box or until you click on the EXIT MAP box. At that time, SNAP sends them to the hard disk. If you decide that you do not want to save your changes to disk press ESC. It is a good idea to periodically save your changes to disk. If you do not do this and you decide that you want to ESC, then all changes will be lost since the last SAVE.
To conserve extended memory, SNAP will permit you to add only a limited amount of data at each editing session between SAVES. How close you are to the limit is displayed on the screen during editing (% of buffer used).
A technical note: When SNAP saves point data to the disk it adds new data to the end of its random access file. If any of the editing involved deleting data on the disk, SNAP does not take the time to recalculate the new locations for data to conserve file space, but merely blanks out some data. Therefore, edited point files can only become larger. The only way the files can be compressed again is by re-BUILDING your data. This will not usually be an important consideration and re-BUILDING is not normally recommended unless you have some other objective in mind such as to regenerating the ROADLOG file with the new link data.
3. SNAP will allow you to update tabular polygon data in the Graphic Editors. The changes will be carried over to the other SNAP editors for polygon data, but NOT link data. Any changes you make to the link data must also be manually done in the Link Editors. The only way to automatically pass the new link data to the other SNAP editors is to EXPORT updated ASCII files and re-BUILD. This is okay if you have not added any information in the SNAP internal editors which is not in the .UA, .US, .UP., .LA., .LP, .SA or .SP files. If you have, this data will be lost.
4. After you have changed any data, you will not be able to generate any existing reports without rerunning the Analysis because SNAP calls on the random access files when it is constructing the reports.
5. It is a good idea to EXPORT edited data out to a new directory.
Exporting your data creates the seven input ASCII files (.UA,.US,.UP,.LA,.LP,.SA,.SP) from the current binary data except any tabular data which was not defined in the ASCII files.
EDITING POLYGONS
Polygons can be combined or split using the POLY options accessed through the Alt F2 key in the Project Filenames Editor. The steps to combine two polygons and split two polygons are described below.
Combining Polygons
1. Access the Graphic Link Editor using key Alt F2 from the Project Filenames Editor.
2. Zoom in on the polygons you want to combine (screen A next page).
3. Click on the COMBINE box with the left mouse button.
4. Click on the first of the two polygons you want to combine using the left mouse button.
5. Click on the second of the two polygons you want to combine using the left mouse button. (screen B next page)
6. Click on the COMBINE box again with the mouse. NOTE: If the combined stick figure will have more than 25 sides, the combining operation cannot take place.
7. Enter the new unit (polygon) label for the polygons you want to combine and click the mouse or press <enter>.
8. Point to the new unit label position and click the mouse or press <enter>.
9. You have created the new polygon. (screen C next page)
10. To update your tabular information for the new polygon, click on the INFO box.
11. To update your tabular information for the new polygons, click on the INFO box. Follow the displayed instructions to highlight the polygon for which you want to update the tabular information. After you highlight the polygon, a pop-up screen will appear.
A)
Select units.
B)
Label new unit.
C)
One unit.
Graphic Unit Editor - Combining polygons
Edit the polygon data. SNAP will have already updated what information it could. It will have calculated the area weighted volume per acre and assigned attributes by using the polygon with the largest area.
12. All changes you have made have been done in volatile memory ONLY. To save the changes to disk click on the SAVE box or click on the Exit Map box. If you do not want to save your changes, press <ESC>. If you do not want to save your changes and you want to reread your original input data, click on UNDO.
Splitting Polygons
1. Access the Graphic Link Editor using key Alt F2 from the Project Filenames Editor.
2. Zoom in on the polygon that you want to split. (screen A next page)
3. Click on the SPLIT box using the left mouse button.
4. Point to the unit (polygon) that you want to split and click the left mouse button. If you are in points mode you will see SNAP change to stick mode. SNAP can only split a polygon at a stick node coordinate. You will see the stick coordinates identified by filled circles.
5. Point to the first location (stick node) you want to split and click the left mouse button.
6. Point to the second location (stick node) you want to split and click the left mouse button. You will now see one of the polygons created by the split highlighted (screen B next page).
7. Enter a unit label for the highlighted polygon.
8. Point to the new unit label position and click on the mouse.
9. Enter a unit label for the other highlighted polygon.
10. Repeat steps 6-7 for the second polygon.
11. The new polygons have been created. (screen C next page)
12. To update your tabular information for the new polygons, click on the INFO box. Follow the displayed instructions to highlight the polygon for which you want to update the tabular information. After you highlight the polygon, a pop-up screen will appear. Edit the polygon data.
A)
Select unit.
B)
Split unit.
C)
Two units.
Graphic Unit Editor - Splitting polygons
13. All changes you have made have been done in volatile memory ONLY. To save the changes to disk click on the SAVE box or click on the Exit Map box. If you do not want
to save your changes, press <ESC>. If you do not want to save your changes and you want to reread your original input data, click on UNDO.
EDITING ROAD LINKS
Links can be added, split or deleted using LINK options accessed through the ALT F3 key of the Project Filenames Editor. The steps to edit links are described below.
Adding Links
1. Access the Graphic Link Editor using key Alt F3 from the Project Filenames Editor.
2. Zoom in on the area where you want to add a link (screen a next page)
3. Click on the ADD box using the left mouse button.
4. Point to the starting node location, then hold down the left mouse button and draw in the new link. You will see it appear as a red line. The link will continue until you lift up on the mouse button (screen b).
a. If your new link begins and terminates at existing nodes the operation has been completed.
b. If your new link does not begin at an existing node, but ends at an existing node, SNAP will create the FROM NODE and will query you for the label of the FROM NODE after you have completed drawing the link (i.e. releasing the left mouse button).
c. If your new link begins at an existing node, but ends at a node that did not previously exist, SNAP will query you for the label of the TO NODE.
d. If your new link begins and ends at nodes that did not previously exist, SNAP will query you for the labels of the FROM NODE and the TO NODE.
5. To update the tabular information for any link, click on the INFO box and follow the displayed instructions to click on the nodes at each end of the link for which you want to update tabular information. A pop-up screen will appear. Edit your changes in the table and the click out of it.
6. All changes you have made have been done in volatile memory ONLY. To save the changes to disk click on the SAVE box or click on the Exit Map box. If you do not want to save your changes, press <ESC>. If you do not want to save your changes and you want to reread your original input data, click on UNDO.
7. Using SAVE option only updates the binary graphic data inside SNAP. You will need to add the link nodes and cost data to the tabular LINK Editor (C.4) manually.
Note: If you want to use the ROADLOG editor to generate the links and link costs for the new links, you will need to use the SAVE option to save your changes, EXPORT your revised data, and REBUILD your files. This is okay if you have not made changes in your ROADLOG or LINK files which cannot be rebuilt.
Splitting Links
1. Access the Graphic Link Editor using key Alt F3 of the Project Filenames Editor.
2. Zoom in on the link you want to split.
3. Click on the SPLIT box with the left mouse button.
4. Highlight nodes at both ends of the link and click on the SPLIT box again.
5. Now move the mouse cursor slowly back and forth horizontally. You should see a pink circle traverse the path of the link. When you have located the pink circle at the location where you want to split the link, click on the left mouse button. You can only split a link at a previously digitized position along the link. SNAP will then prompt you for the new node label (screen c next page).
6. To update the tabular information for any link, click on the INFO box and follow the displayed instructions to click on the nodes at each end of the link for which you want to update tabular information. A pop-up screen will appear. Edit your changes in the table and the click out of it.
7. All changes you have made have been done in volatile memory ONLY. To save the changes to disk click on the SAVE box or click on the Exit Map box. If you do not want to save your changes, press <ESC>. If you do not want to save your changes and you want to reread your original input data, click on UNDO.
8. Using SAVE option only updates the binary graphic data inside SNAP. You will need to add the link nodes and cost data to the tabular LINK Editor (C.4) manually.
Note: If you want to use the ROADLOG editor to generate the links and link costs for the new links, you will need to use the SAVE option to save your changes, EXPORT your revised data, and REBUILD your files. This is okay if you have not made changes in your ROADLOG or LINK files which cannot be rebuilt.
A)
Existing links.
B)
New link-
Add new link.
C)
Split a link.- New node
Graphic Link Editor - Adding or splitting links
Deleting Links
1. Access the Graphic Link Editor using key Alt F3 of the Project Filenames Editor.
2. Zoom in on the link you want to delete.
3. Click on the DELETE box with the left mouse button.
4. Highlight nodes at both ends of the link and click on the DELETE box again. The link will disappear. If the deleted link was the only access to a node, the isolated node will disappear also.
5. All changes have been made have been done in volatile memory ONLY. To save the changes to disk click on the SAVE box or click on the Exit Map box. If you do not want to save your changes, press <ESC>. If you do not want to save your changes and you want to reread your original input data, click on UNDO.
6. Using SAVE option only updates the binary graphic data inside SNAP. You will need to delete the link in the tabular LINK Editor (C.4) manually.
EDITING STREAM SEGMENTS (stream links)
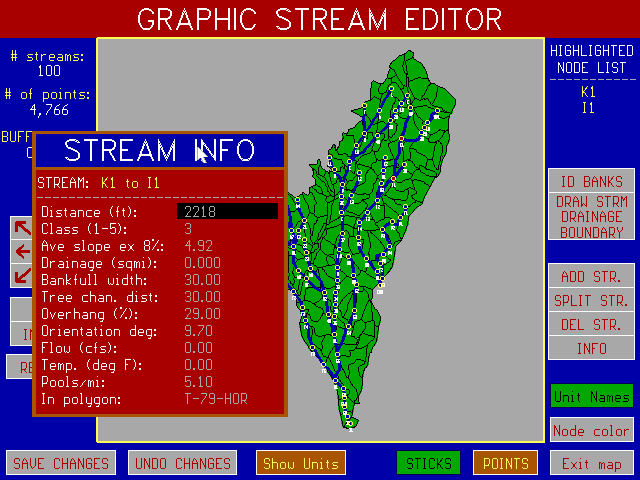
To edit stream links, press Alt F8 while in the Project Filenames Editor. Stream links are edited in exactly the same way as road links. You have options to ADD, DELETE, SPLIT, or change stream attributes (INFO). The only difference is in the ADD option. If you add a stream segment, you must remember to begin drawing from the upstream node. Added streams should not form loops.
There are several more options:
ID BANKS - This is used to activate a routine in SNAP to identify the polygons on the east and west banks of each stream segment so that SNAP will be able to determine the seral stage of the vegetation on each side of the stream. If you click on this box, the stream segments will blink by in the top row as SNAP is identifying the banks. To identify the polygons on each side of the bank, SNAP looks at a point 50 feet on each side of the coordinate of the midpoint of the stick segment.
DRAW STRM DRAINAGE BOUNDARY - This is used if you want to identify drainage boundaries for a stream segment. To use this option:
1. Zoom in on the area you want to work with.
2. Click on the upstream and downstream nodes for a segment.
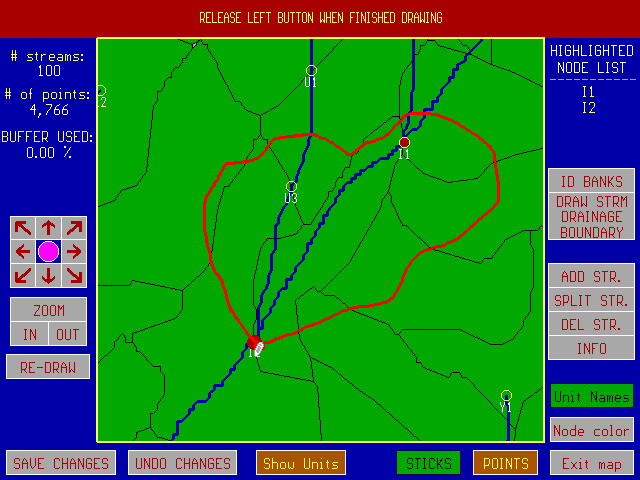
3. Then, click on the DRAW STRM DRAINAGE box.
4. Move the cursor to where you want to begin drawing the boundary,
5. Hold down the left button of the mouse and begin drawing. You will see a large red dot appear. This is to help you know where you need to return to. After you have completed the boundary, release the button of the mouse. You will see the drainage area in square miles in the upper right corner of screen. You will also see the stream segment turn light blue. This means you have identified a drainage area for this segment. The drainage area is considered to enter at the downstream node for purposes of flow calculations. If stream segments come together at a junction, SNAP will add the drainage area for each stream segment to get the drainage area for the total flow.
6. You can now move to another segment and draw a new boundary. The boundary for the previous segment will remain on the screen as a reference.
IF you make a mistake before you have completed the loop, simply release the mouse button and the boundary will disappear. If you discover you have made a mistake after you have completed the loop, then click on REDRAW to get rid of the old boundary on the screen. Then redraw the boundary.
It is a good idea to save your changes once in a while using the SAVE CHANGES option.
Stream Flow - Stream flow data can handled in three ways.
1. Polygons can be attached directly to a stream node in the polygon editor (Alt F2, Project Filenames Editor). If this is done, the entire area of the polygon is attached to a specific stream node for drainage calculations. The drainage coefficient in cubic feet per sec per square mile is entered in the Report Writer. (See parameters in Graphic Report #7, Chapter 4)
2. Drainage areas can be specified individually using the DRAW STRM BOUNDARY option described above.
3. The flow and temperature at the downstream node for a stream segment can be entered directly through the INFO option of the Stream Editor (Alt F8, Project Filenames Editor). Entering flow and temperature data directly will override drainage calculations. If flow is entered without temperature, the base ground water temperature will be used as a default (See Parameters in Graphic Report 7, Chapter 4).
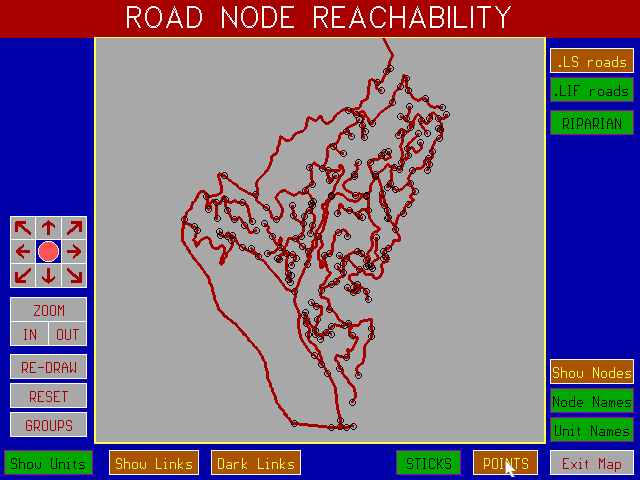
CHECKING NETWORK CONNECTEDNESS
A frequent problem with data sets is having a network which does not connect potential harvest units with potential destinations. To help you decide if you have a disconnected network SNAP can check your network input data (.LP) or the link file created in the Link Editor (.LIF) and graphically display the results.
To access the network checking routines, select Alt F4 on the Project Filenames to bring up the Road Node Reachability Graphic Editor.
The .LP Option
This option lets you check the input data. SNAP reads the .LP file, and temporarily creates an undirected network (two-way links). If you click on to any node on the network you will see all the nodes which can be reached from it. If you click on the GROUPS box with the mouse, SNAP will automatically identify all separate groups of nodes. Links within isolated groups of nodes will be shown in different colors.
The .LIF Option
This option lets you check the Link File (.LIF) before Analysis. The .LIF file contains the set of road links which will be used for analysis. It is the summary of links (one or two-way) resulting from any editing you have done. In this case, SNAP will check the directed network. If you click on to any node on the network you will see all the nodes which can be reached from it in the "loaded" direction.
Code Definitions Editor
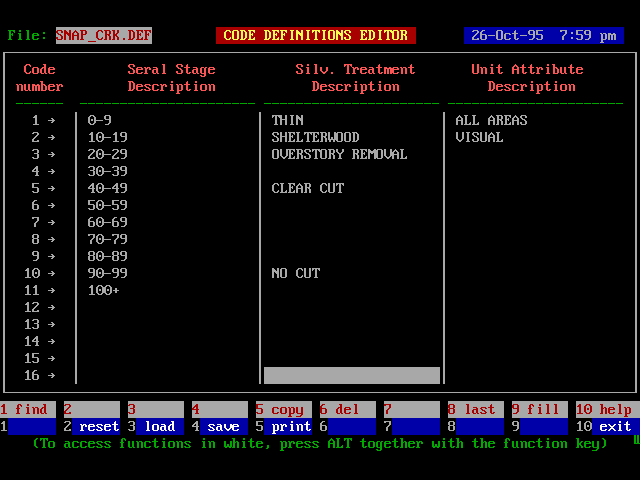
|
CODE NUMBER |
This is the code number associated with a seral stage, silvicultural treatment or unit attribute. The purpose of the Code Definitions Editor is to permit you to record alphanumeric descriptions in a place where you can refer to them during problem formulation or report review. In other editors you will enter code numbers and the alphanumeric labels will be displayed. |
|
SERAL STAGE |
See discussion in the Silvicultural Treatment Editor. For discussion of using seral stages for the "50-11-40" rule, aggregate hydrologic recovery percentage and forage-cover ratios, see Seral Stage and Silvicultural Treatment Goals Editors |
|
SILVICULTURAL TREATMENT |
See discussion in the Silvicultural Treatment Editor. |
|
UNIT ATTRIBUTE |
Examples would be elk winter range, owl nesting habitat, erosive soils, aspect, elevation, and riparian zone. Attributes can be passed to SNAP in the .UA file or can be entered and modified in the Polygon Attributes Editor. |
Special function keys:
|
F1 |
Not used in this editor. |
|
F2 |
Used to reset the editor. |
|
F3 |
Used to access and load other .DEF files in the current directory. |
|
F4 |
This key allows you to save the current file immediately with the option of changing the filename. If you change the filename, then you will be asked if you wish to update the project filenames (this effectively means "do you want this new file to be retrieved when you re-enter this editor at some later date"). |
|
F5 |
Used to make a hard copy of the .DEF file on the specified output device. |
|
F6 |
Not used. |
|
F7 |
Not used. |
|
F8 |
Not used. |
|
F9 |
Not used. |
|
F10 |
Used to return to the Main Menu. If you have made any changes to your data then they will be saved to the current filename automatically as you return to the main menu. To leave without saving changes use ESC, not F10. |
|
ALT F1 |
Used to find an alphanumeric label in the column in which the cursor is in. |
|
ALT F4 |
Do not use in this editor. |
|
ALT F5 |
Used to copy lines between the specified beginning and ending line and inserts the copied lines beginning at the current cursor location. |
|
ALT F6 |
Used to access a file utility which can be used to delete, view, and hide files. |
|
ALT F7 |
Not used. |
|
ALT F8 |
Jumps to the last line in the editor with a non-blank entry. |
|
ALT F9 |
Used to fill in a column with a specified value or alphanumeric entry. |
|
ALT F10 |
Used to get help. |
Polygon Attributes Editor (Text Table)
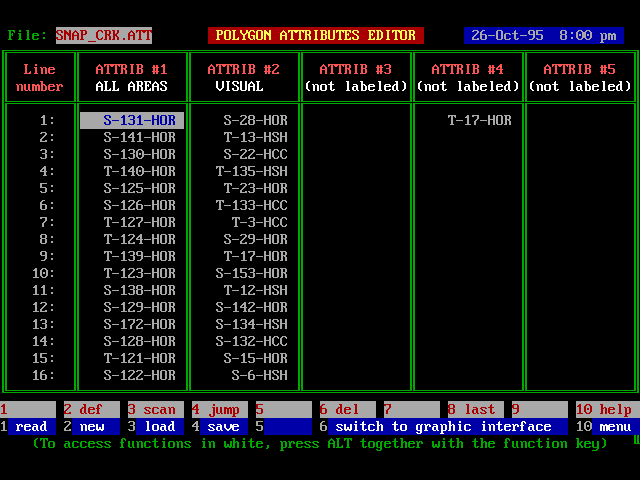
Column Heading - The attribute code value and alphanumeric name which was passed from the Definitions Editor.
Note: This text table communicates with the Attribute Selection Graphics Interface (accessed through F6 and described in the next menu).
Special function keys:
|
F1 |
Used to read in the attribute values from the unit stick data. |
|
F2 |
Used to reset the editor. |
|
F3 |
Used to access and load other .ATT files in the current directory. |
|
F4 |
This key allows you to save the current file immediately with the option of changing the filename. If you change the filename, then you will be asked if you wish to update the project filenames (this effectively means "do you want this new file to be retrieved when you re-enter this editor at some later date"). |
|
F5 |
Not used. |
|
F6 |
Used to switch to the Graphic Attribute Selection Editor. |
|
F7 |
Not used. |
|
F8 |
Not used. |
|
F9 |
Not used. |
|
F10 |
Used to return to the Main Menu. If you have made any changes to your data then they will be saved to the current filename automatically as you return to the main menu. To leave without saving changes use ESC, not F10. |
|
ALT F1 |
Used to find an alphanumeric label in the column in which the cursor is in. |
|
ALT F2 |
Used to temporarily access the Definitions Editor to review code names and definitions. |
|
ALT F5 |
Not used. |
|
ALT F6 |
Used to access a file utility which can be used to delete, view, and hide files. |
|
ALT F7 |
Not used. |
|
ALT F8 |
Jumps to the last line in the editor with a non-blank entry in the column where the cursor is located |
|
ALT F9 |
Not used. |
|
ALT F10 |
Used to get help. |