Omnidirectional Microphone Set
This microphone set is a (stereo) pair in an integrated package. It is
intended for high quality music recording where a pair of omni mics is
appropriate.
Installation and Hook-Up
The set consists of:
1) Two microphone capsules, which are detachable
 2) The cable and battery box package
 Unscrew the four Phillips head screws to open the cover of the battery
box. Find the two snap battery connectors, and connect a 9 volt
transistor radio type battery to each. One battery powers one microphone
channel, so if one goes dead, the other should still work. Place the two
batteries on their sides, adjacent to each other, in the center well of
the battery box. They should fit perfectly. Position the wires so they
don't get pinched in the cover and replace the cover.
Unscrew the four Phillips head screws to open the cover of the battery
box. Find the two snap battery connectors, and connect a 9 volt
transistor radio type battery to each. One battery powers one microphone
channel, so if one goes dead, the other should still work. Place the two
batteries on their sides, adjacent to each other, in the center well of
the battery box. They should fit perfectly. Position the wires so they
don't get pinched in the cover and replace the cover.
 Connect the mic capsules to the cables. Note that there is a locking
button on the female connector which must be pressed to release the mic
capsule when you remove them. On the other side of the battery box,
connect the phone plugs to microphone inputs on your tape recorder. When
you are not using the mics, remove them or they will drain the
batteries. With ordinary use the batteries should last many months.
Connect the mic capsules to the cables. Note that there is a locking
button on the female connector which must be pressed to release the mic
capsule when you remove them. On the other side of the battery box,
connect the phone plugs to microphone inputs on your tape recorder. When
you are not using the mics, remove them or they will drain the
batteries. With ordinary use the batteries should last many months.
 The cables are each about 15 feet long, but should you need a greater
distance from your mics, you can use professional type microphone
extension cables that use the same style connectors as the mics.
Distances up to about a hundred feet should be OK. It is not recommended
that extensions be added to the phone plugs on the other side of the
box.
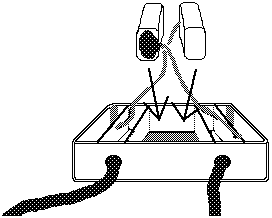
Tips On Use
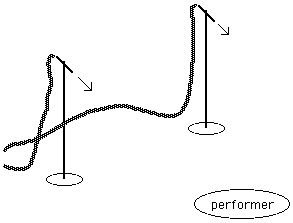
These mics are intended to be used for high quality music recording in a
manner known in the recording industry as A-B, or spaced omni mic
placement. The mics are typically spaced apart about 8 feet and
approximately equidistant from the performer. They should be somewhat
above the performer.
The cables are each about 15 feet long, but should you need a greater
distance from your mics, you can use professional type microphone
extension cables that use the same style connectors as the mics.
Distances up to about a hundred feet should be OK. It is not recommended
that extensions be added to the phone plugs on the other side of the
box.
Tips On Use
These mics are intended to be used for high quality music recording in a
manner known in the recording industry as A-B, or spaced omni mic
placement. The mics are typically spaced apart about 8 feet and
approximately equidistant from the performer. They should be somewhat
above the performer.
 The microphones are omnidirectional, that is they pick up sound from ALL
directions. They do, however, have a brighter sound directly in front,
on axis. You can use this to your advantage by aiming directly when you
want a bright sound, and aiming slightly away when you want a smoother
sound.
If you use the mics outside, you must put a foam windscreen over the mic
capsules or the wind will cause a tremendous rumble in the recording.
Get any generic windscreen such as Radio Shack's, even if it doesn't
quite fit and must be taped on.
Some tape recorders have a switch on them called "MIC ATT(enuator)", and
may have two or more positions such as " 0dB, -10 dB, or -20dB" This is
meant to reduce the strength of the microphone signal before the mic
preamp circuitry in the recorder, and it is not the same as turning down
the record level controls. Inexperienced recordists, when confronted
with a very loud program , will just turn down the record level controls
in order to keep the VU meters out of the red area, and still end up
with a distorted recording.This is usually NOT the mic overloading, or
so called tape saturation from too high a record level, but overload of
the mic preamp circuitry in the recorder. The solution is to attenuate,
or reduce, the signal going to the mic preamp, and this is what this
switch does. Therefore, if you are recording a loud program, and you
find that you can barely turn up the record level control and still get
too strong a signal in the VU meters, you should attenuate the mic
signal with the attenuator switch. It is also possible to modify this
mic set (see the technical section).
Gary Louie
University of Washington School of Music
Box 353450
Seattle, WA 98195
206-543-1218
Technical Section
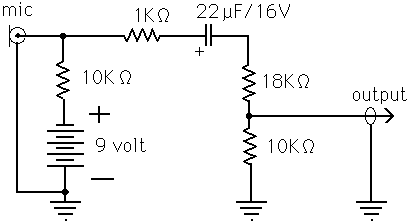
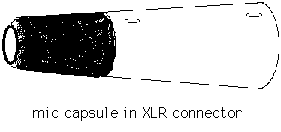
The mic set uses a 1/4 inch omnidirectional electret capsule made by
Matsushita/Panasonic (WM-063T, available from Digi-Key Electronics). It
is set with silicone RTV into the end of a Switchcraft A3M connector.
Signal is through pin 2, ground is pin 1. Pin 3 and shell are not
connected. The battery box holds the batteries which power the electret
capsules, which have internal FET preamp/impedance converters. A
capacitor blocks the DC to the tape recorder, and a resistor network
attenuates the signal to a nominal microphone level. The entire wiring
is electrically unbalanced. Source impedance is about 5K ohms, and
should work acceptably with any low impedance mic input. Very low
professional inputs may reduce signal level somewhat, but typical
consumer mic inputs are about 5 K ohms input impedance and this gives a
very normal level.
Signal level can be modified in the battery box if desired. Changing the
18K ohm resistor to 30K or 50K will give about 10 or 20 dB less
signal.
The microphones are omnidirectional, that is they pick up sound from ALL
directions. They do, however, have a brighter sound directly in front,
on axis. You can use this to your advantage by aiming directly when you
want a bright sound, and aiming slightly away when you want a smoother
sound.
If you use the mics outside, you must put a foam windscreen over the mic
capsules or the wind will cause a tremendous rumble in the recording.
Get any generic windscreen such as Radio Shack's, even if it doesn't
quite fit and must be taped on.
Some tape recorders have a switch on them called "MIC ATT(enuator)", and
may have two or more positions such as " 0dB, -10 dB, or -20dB" This is
meant to reduce the strength of the microphone signal before the mic
preamp circuitry in the recorder, and it is not the same as turning down
the record level controls. Inexperienced recordists, when confronted
with a very loud program , will just turn down the record level controls
in order to keep the VU meters out of the red area, and still end up
with a distorted recording.This is usually NOT the mic overloading, or
so called tape saturation from too high a record level, but overload of
the mic preamp circuitry in the recorder. The solution is to attenuate,
or reduce, the signal going to the mic preamp, and this is what this
switch does. Therefore, if you are recording a loud program, and you
find that you can barely turn up the record level control and still get
too strong a signal in the VU meters, you should attenuate the mic
signal with the attenuator switch. It is also possible to modify this
mic set (see the technical section).
Gary Louie
University of Washington School of Music
Box 353450
Seattle, WA 98195
206-543-1218
Technical Section
The mic set uses a 1/4 inch omnidirectional electret capsule made by
Matsushita/Panasonic (WM-063T, available from Digi-Key Electronics). It
is set with silicone RTV into the end of a Switchcraft A3M connector.
Signal is through pin 2, ground is pin 1. Pin 3 and shell are not
connected. The battery box holds the batteries which power the electret
capsules, which have internal FET preamp/impedance converters. A
capacitor blocks the DC to the tape recorder, and a resistor network
attenuates the signal to a nominal microphone level. The entire wiring
is electrically unbalanced. Source impedance is about 5K ohms, and
should work acceptably with any low impedance mic input. Very low
professional inputs may reduce signal level somewhat, but typical
consumer mic inputs are about 5 K ohms input impedance and this gives a
very normal level.
Signal level can be modified in the battery box if desired. Changing the
18K ohm resistor to 30K or 50K will give about 10 or 20 dB less
signal.