 Modeling the Nervous System Sometimes the best way to learn about something is to hold it in your hand. |
|

|
 Make a
Neuron
Make a
Neuron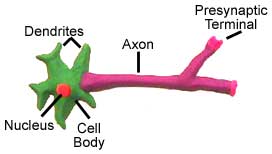
 If you would like to use this
"build a neuron" as a classroom activity, here is a
If you would like to use this
"build a neuron" as a classroom activity, here is a 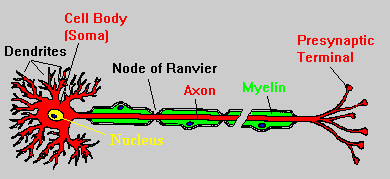

|
|
|
 |

|
 Materials:
- Wire
- 65 beads (4 different colors)
| ||||||||
|
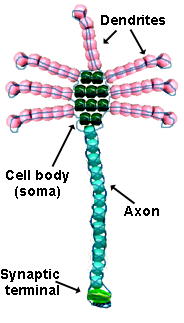
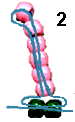
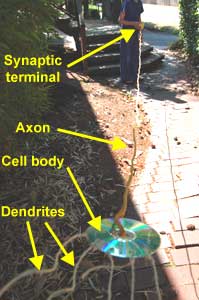
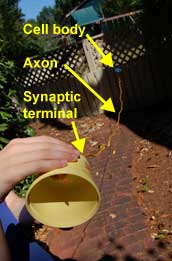
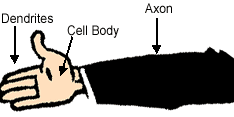
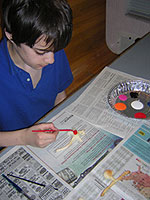
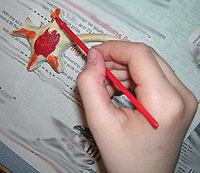
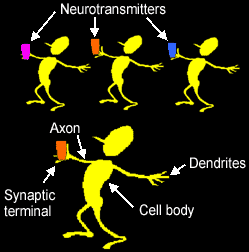
| 1. Take one
pipe cleaner and roll it into a ball. This is will be the cell body. 2.Take another pipe cleaner and attach it to the new "cell body" by pushing it through the ball so there are two halves sticking out. Take the two halves and twist them together into a single extension. This will be the axon. |
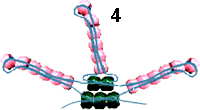
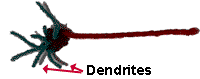 | 3.Take other pipe cleaners and push them through the "cell body" on the side opposite the axon. These are dendrites. These can be shorter than your axon and you can twist more pipe cleaners to make more dendrites. |
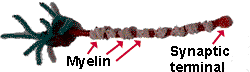 | 4.Wrap small individual pipe cleaners along the
length of the axon. These will represent the myelin sheath. 5. Wrap another pipe cleaner on the end of the axon. This will be the synaptic terminal. |
|
|
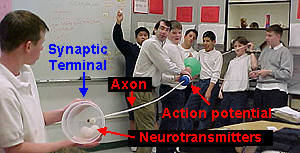
 CAUTION: The pool float
will travel
very fast! Make sure that the person holding the synaptic terminal keeps
his or her fingers and hands AWAY from the pool float.
CAUTION: The pool float
will travel
very fast! Make sure that the person holding the synaptic terminal keeps
his or her fingers and hands AWAY from the pool float.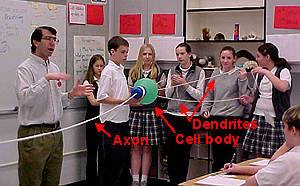
|

|
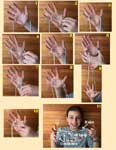
 Can't think of a costume for Halloween? Why not be a neuron? The idea
sent in by Kate V.; you can see her is wearing her neuron costume in the
photograph.)
Can't think of a costume for Halloween? Why not be a neuron? The idea
sent in by Kate V.; you can see her is wearing her neuron costume in the
photograph.)
|
|
|
|
| ||||||||||||
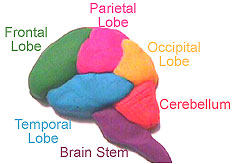
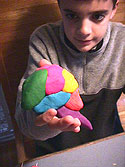
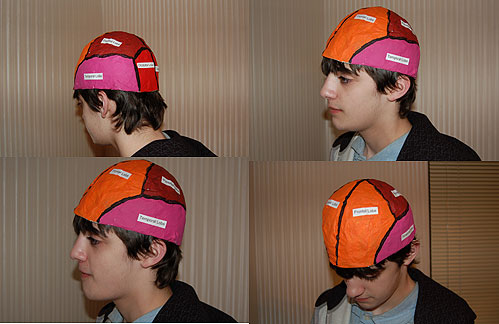
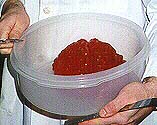
| Baked Brains/Baked Neurons | ||
Uncooked Neuron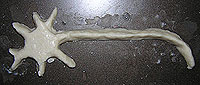 |
Baked Neuron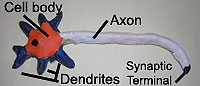 |
Baked CNS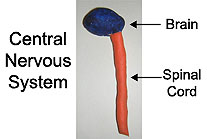 |
 |
 |
Uncooked CNS |
 |
Uncooked Brain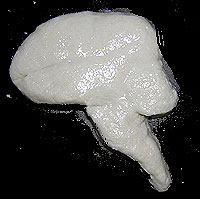 |
Baked Neurons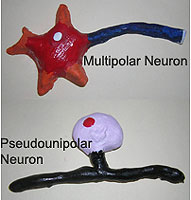 |
|
 Grades 1-12
|
 Grades 4-12
|
 Grades K-12
|
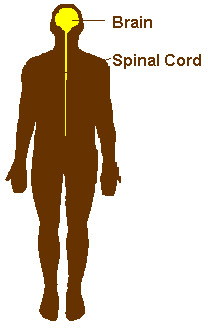
 The human spinal
cord is protected by the bony spinal column shown. There are 31 segments
of the spinal cord and 33 bones (vertebrae) that surround these segments.
There are 7 cervical vertebrae, 12 thoracic, 5 lumbar, 5 sacral and 4
coccygeal vertebrae in the human body. To model these bones, get 33 empty
spools of thread (buttons may also work or slices of paper towel holders).
Run a string or thread through the middle of one of the spools or buttons.
Tie off one end of the string and put the remaining spools or buttons on
the string. Each spool (or button) will represent one vertebra. When
your model is finished, notice how it can bend. In a real spinal column,
the vertebrae are held together by ligaments.
The human spinal
cord is protected by the bony spinal column shown. There are 31 segments
of the spinal cord and 33 bones (vertebrae) that surround these segments.
There are 7 cervical vertebrae, 12 thoracic, 5 lumbar, 5 sacral and 4
coccygeal vertebrae in the human body. To model these bones, get 33 empty
spools of thread (buttons may also work or slices of paper towel holders).
Run a string or thread through the middle of one of the spools or buttons.
Tie off one end of the string and put the remaining spools or buttons on
the string. Each spool (or button) will represent one vertebra. When
your model is finished, notice how it can bend. In a real spinal column,
the vertebrae are held together by ligaments.
|

|
|
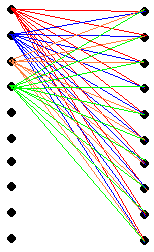 This exercise is to illustrate the complexity of the connections of the
brain. Draw 10 dots on one side of a piece of paper and 10 dots on the
other side of the paper. Assume these dots represent neurons, and assume
that each neuron makes connections with the 10 dots on the other side of
the paper. Then connect each dot on one side with the 10 dots on the
other side. As you can see from the diagram below, it gets very
complicated after a while. I have only connected 4 of the "neurons".
This exercise is to illustrate the complexity of the connections of the
brain. Draw 10 dots on one side of a piece of paper and 10 dots on the
other side of the paper. Assume these dots represent neurons, and assume
that each neuron makes connections with the 10 dots on the other side of
the paper. Then connect each dot on one side with the 10 dots on the
other side. As you can see from the diagram below, it gets very
complicated after a while. I have only connected 4 of the "neurons".
|
 Compare and Discuss:
|
 The brain has a tough job. It is works all the time and the eye
has to make things difficult. The convex nature of the lens of the eye
turns an image upside down on the
The brain has a tough job. It is works all the time and the eye
has to make things difficult. The convex nature of the lens of the eye
turns an image upside down on the Read more about the retina.
|
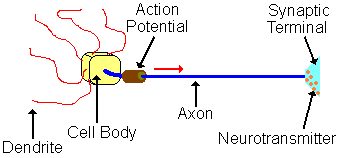
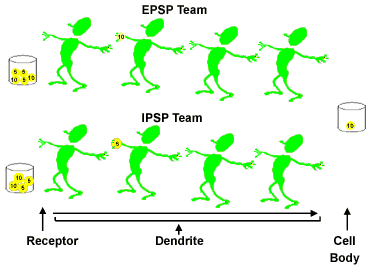
 Messages
can travel in neurons at speeds up to 268 miles/hr! These signals are
transmitted from neuron (nerve cell) to neuron across "synapses."
Messages
can travel in neurons at speeds up to 268 miles/hr! These signals are
transmitted from neuron (nerve cell) to neuron across "synapses."
|
|
|
|
 The
The 
|


|
|
|
| Vision | Smell | Taste | Touch | Hearing | Emotions | Movement | Memory | Speech | Heart Rate | Breathing | Thinking | Planning | Problem Solving | Reading | Control Hormones | Sleep | Balance | Eating | Drinking |
Mix the papers in a bowl, bag or a hat. A player should pick a paper out of the bowl then act out the function. Everyone else should try to guess what the player is acting out. Actors must remain silent. When someone guesses the action, write the word on the board. Another player should select a new word and act it out. Repeat the game until all of the words have been identified correctly.
Materials:
- Paper
- Pen or pencil
- Container for words
| GO TO: | Hearing | Smell | Taste | Touch | Vision | Working Together |
| BACK TO: | The Senses | Experiments and Activities | Table of Contents |
![[email]](./gif/menue.gif) Send E-mail |
![[newsletter]](./gif/menunew.gif) Get Newsletter |
![[search]](./gif/menusea.gif) Search Pages |
 Donate to Neuroscience for Kids |